Welcome to the ~sightRipple Help System
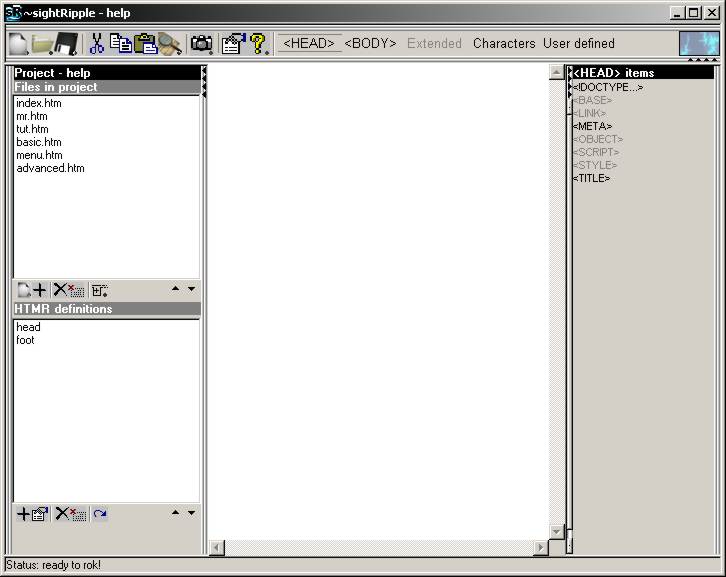
The ~sightRipple Help System is the replacement for the manual that does not exist. It holds a lot of information (NOTE: Not yet, as it is still under heavy construction) on how to use the program and on how to build homepages on it. Bellow this text is a screenshot of the main window, and bellow that is a describtion of what the things on the main window are. ~sightRipple is here shows with the standard theme. You must choose the theme on your own, as this is not done automatically. Do this by going to the Preferences dialog as described bellow.
Main toolbar

- New...
- Reveals the following menu:
- New project
- Will erase all information about the current project to create a new. The contents of any currently opened file will remain in the editing window to have something to work on.
- New file... [CTRL]+N
- Spawns a dialog window where you can choose how to create the new file
- Add file to project... [CTRL]+D
- Add an existing file to the project (same function as Open|Add file to project...)
- Open...
- Reveals the following menu:
- Open project... [CTRL]+O
-
- Add file to project... [CTRL]+D
- Add an existing file to the project (same function as New|Add file to project...)
- List of files in project
- This is a list of all the files currently in the project. It is the same list as the one in the Project pane, and you will probably use it, if you have hidden the Project pane.
- Save...
- Reveals the following menu. If no content is present in the editing window, the program will ask you in stead if you wish to save the project:
- Save the current file [CTRL]+S
- Save the currently open file. If no filename is associated with the file at the moment, the function work in the same way as the Save current file as... function
- Save current file as...
- Spawn a Windows save dialog where you can choose where to save the current file. When you click OK ~sightRipple will ask you if you wish to add the file to the project
- Save project [CTRL]+W
-
- Cut [CTRL]+X
- Save the current selection to the Windows clipboard and remove it from the editing window.
- Copy [CTRL]+C
- Save the current selection to the Windows clipboard and leave it in the editing window.
- Paste [CTRL]+V
- Insert the contents of the Windows clipboard at the cursor. If there exists a selection, it will be overwritten.
- Search
- Reveals the following menu:
- Search... [F3]
- Search through the current document after a string.
- Search and replace in current file... [SHIFT]+[F3]
- Search through the current document after a string and replace it with another string.
- Search and replace in project... [CTRL]+[F3]
- Search through the entire project after a string and replace it with another string. Please note that no acknowledgement other than the first is offered!
- Preview
- Reveals the following menu: (not available yet...)
- Settings
- Show the Settings dialog
- Help...
- Reveals the following menu:
- Help [F1]
- Show this help system
- About... [SHIFT]+[F1]
- Show the about dialog
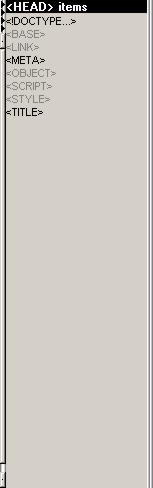
- HEAD
- Show the items related to the HEAD area of an HTML file in the Element pane. For example the !DOCTYPE statement, the META element and the LINK element.
- BODY
- Show the items related to the BODY area of an HTML file in the Element pane. For example the BODY definition itself, the Anchor (A) element and the Underline (U), the Bold (B) and Italic (I) elements.
- Extended
- Not completed, but will contain elements native to certain browsers. For example Navigator's BLINK element.
- Characters
- Show the ASCII character sheet in the Element pane. The four categories Normal, Greek, Symbol & math and Markup & international are all here. Also in the Normal characters section there is a button reading "Convert ext. chars." Clicking on this button will reveal a menu with two options: Convert extended characters in current document and Convert extended characters in entire project. The two menu items both basically do the same, they convert any of the international characters to their ISO counterpart.
- User defined
- Show the user defined elements in the Element pane. Even though ~sightRipple has been packed with all the elements of the HyperText Marup Language we could find, there will always be places we can't get to, and you might want to add special things to insert into your documents... This is examplified by the element that is there by default: A link to the ~sightRipple homepage, with various things attached.
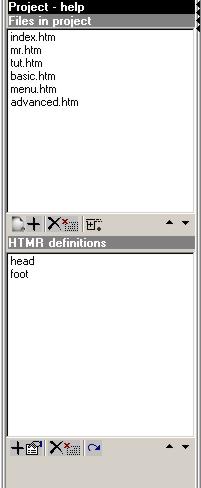
Project pane
Files in project
- File list
- This is the files currently in the project. Double-clicking on a file in the list will open it for editing. Right-clicking on the list will reveal a menu identical to the Extended file commands menu (see bellow)
- New...
- Reveals a menu itentical to the New menu from the main toolbar.
- Add file
- Add an existing file to the project. Holding [SHIFT] while clicking will cause ~sightRipple to add an entire folder in stead.
- Remove selected file from project
- The currently selected file (not the currently open file) will be removed from the project, it will still remain on disk. If the file is currently open for editing, the removal process will continue, and editing will too as if the file still was in the list. When the file is closed (i.e. another file is opened or a new file is created) it will no longer have any contact with the project.
- Purge file list
- Remove all files from the project. This function is here to enable you to re-use the HTMR file in another project without using the same file and thus risking damaging the first. If a file is open for editing, the same rules apply as above.
- Extended file commands
- Reveals the following menu:
- Edit list entry
- This will show an input box where you can edit the list entry by hand
- Sort alphabetically
- Sort all the entries in the File list alphabetically. This is a big advantage, as the files easily get mixed up if you do not do this.
- Remove pattern from file list
- This will show an input box where the default value is the project path. It is a good idea to remove the path to the project from the file list, as it will make it a lot easier to transport the HTMR file from one computer or even folder to another. This will also be an advantage if the HTMR standard is ever recognized by the World Wide Web Consortium (W3C)
- Delete selected file physically
- Does exactly that. It will also remove the file from the project, as there is of course no reason for the entry to be there when the file no longer exists.
- Move file physically
- WARNING! EXTREMELY EXPERIMENTAL! This function is by no means completed and should not be used! When the function is complete, it will enable you to move a file physically to whereever you want. All links in the project (of course only those that are already pointing to the file) will be updated, also in the HTMR deinitions. You can choose to not update the links in any or more files and HTMR definitions you choose.
- Move entries up and down
- Does exactly that. Clicking either of these two buttons will move the currently selected file entry up or down by one. If the file is at the end, clicking to make it move on will cause the file to pop down (or up) to the other end of the file list.
HTMR Definitions
- Definition list
- This is the definitions currently in the project. Double-clicking on a definition in the list will open it for editing. This will happen in a new window, and you should take advantage of the learning function of ~sightRipple: If you create the definition in the Editing window and wrap it in an HTMR tag, right click on the start tag and choose Learn HTMR Snippet. This will also work if it is a new definition (i.e. a definition that is not already in the list)
- Add HTMR definition
- This will show an input box where you write the name of the new definition. A new element will show up at the bottom of the current list. Double-click on it to edit it. Read above, though, for a better way of adding the HTMR definitions.
- Edit HTMR definition
- This will show a dialog where you can edit the HTMR definition and it's name.
- Remove definition
- This will remove the currently selected definition. It will also erase whatever content the definition had. Please note that this action is NOT undoable!
- Purge definition list
- Remove all definitions from the list. It will also erase whatever content the definitions had. Please note that this action is NOT undoable! If you do this by mistake, you must reload the project to undo back to last save.
- Update HTMR in files
- This will update the HTMR definitions in all files in the project. Please note that when this is done you will have to reload the file currently being edited, as this as a safety precaution is not done automatically!
- Move entries up and down
- Does exactly that. Clicking either of these two buttons will move the currently selected definition entry up or down by one. If the definition is at the end, clicking to make it move on will cause the definition to pop down (or up) to the other end of the file list.
Editing window
The editing window has some features that are not very unlike other text editors. The right-click menu has first of all the four standard-items Cut, Copy, Paste and Undo. Additional items will appear whenever they are needed, for example there will be an option of editing the IMG element in a dialog, whenever the cursor inside it. Please note that the menu is cursor sensitive, not mouse sensitive. This means you have to place the cursor at the apropriate place and then right-click.
Element pane
this document is copyright © 2000 by ~MindRipple Productions.